Installing Mambo CMS is easy as point and click with your mouse. But, before installing, let see some requirements must met.
You must have:
- Mambo CMS Installer
You can download it in Mambo official website. Just take the newest release you can find. In this tutorial, I have download Mambo release 4.6.5 stable codename Jupiter. - Web Server with support to PHP and MySQL
The best for us is Apache httpd server. If you ahave not install XAMPP yet, try XAMPP. XAMPP is a set of packages distributed by apachefriend.org. It contains latest release of Apache httpd server, mysql database server and client, PHP, Perl, sendmail, FileZilla ftp server, and some stuffs. XAMPP available in many architecture, include Linux (LAMPP), Windows (WAMPP) and MacOS (MAMPP).
If all requirements met, uncompress the Mambo installer to /opt/lampp/htdocs or /var/www or to your public_html directory in remote web server.
Pre-Requierement and Installation Check
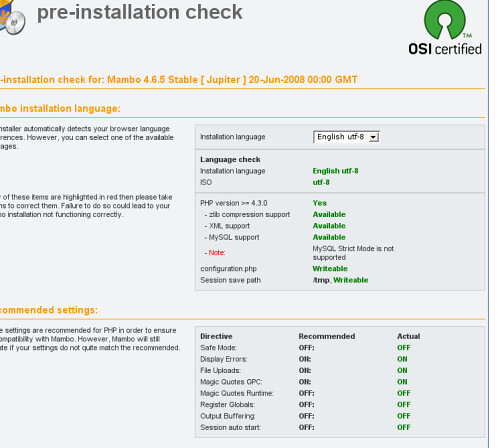
Open your browser, point it to http://localhost/mambo or http://your-website.com. You will greet with pre-requirement and installation check. In this page, you can see if your web server has the feature requested to run Mambo site properly and also it checks your php parameters and the file and directory permissions.
The main feature that must met for web server are:
- PHP version >= 4.3.0, old version from 4.3.0 not work with the mambo release.
- zlib compression support
- XML support
- MySQL support
- File and directory permission must set to writable
- Session save path must exist, its in /tmp directory and must writeable too
In recommended settings section, there some PHP configuration must corected before installing. The configuration with green color, mean the configuration is correct. But if the configuration in red, you must corect it for your site safety.

mambo pre requirement checkmambo pre requirement check
Edit the PHP configuration file, dinf the php.ini file in /opt/lampp/etc directory in your xampp installation or c:php in Windows or in /etc/apache2 if you installing php manual through apache module.
For file and directory permission, to corrected it, just change the permission through commandline or terminal use this command:
chmod -R 777 mambo-diretory/
If all pre-installation checks pass, click the next button in top right corner. Go to next step, the license aggrement.

Mambo is an open source program adopted from Australian company internal program. Although mambo is open source, some mambo developer dis-satisfied and feel not free enough with the conditions, therefore the quit, and voila, Joomla is born, the ward winning CMS.
But now, we talk about mambo ya.
Step 1. MySQL Database Configuration
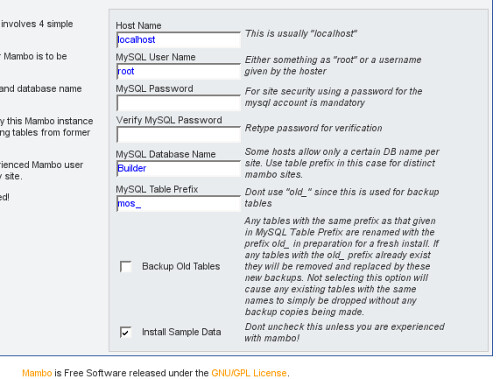
This step is the “real” step from mambo installation process. make sure you have create a database with the privileged user to the database. If not yet, create one use phpmyadmin or through your web hosting cpanel.
Enter the configuration data as this:
- mysql database name
- privileged mysql database username
- mysql database user password
- the address of mysql server. Usually its localhost
- database prefix, pre word or character as identifier and to avoid overwrite if you installing mambo in single shared mysql database

Don’t forget to check the “Install sample data” box before you click next button, if you never installing mambo before and want to learn before. Don’t check to installing fresh from the oven of Mambo ![]()
Step 2. Enter The Name of Your Mambo Site
Give a good name. For example, the slogan or mission or whatever you like.

Step 3. Confirm Your Installation
In this third step, you have chance to change the random password created by mambo.In this step you can change back the file and directory permission for your safety.

If you are not sure about the permission, leave it in the default values settings.
Step 4. Congratulations! Mambo is Installed
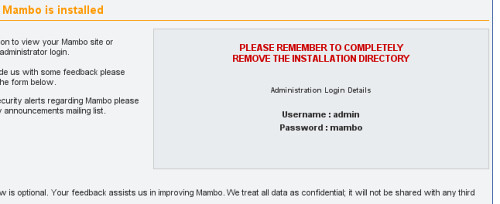
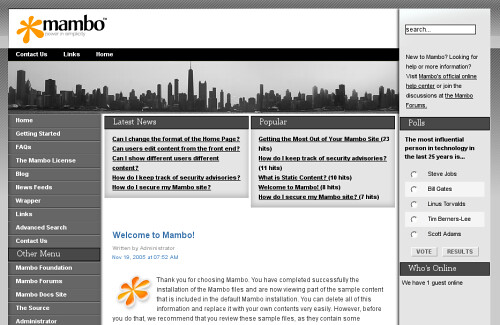
Congratulations, you have sucessfull installing Mambo. Its time to view your fresh Mambo installation or to administer it. Click the “View Site” button to see the frontpage or “Administration” button to administer it. You can login as admin with the password supplied.

But before, you must delete or rename the directory named installation in your directory. It s for your safety!

Then, may you need to configure it more. I hope, I have chance to write about it next time.
Reference that may valuables:
- Panduan Instalasi XAMPP/LAMPP
panduan menginstall dan men-setup lampp/xampp - ApacheFriends.org
- Mambo-Foundation.org
Written by amrinz
Permalinks: Mambo CMS Installation Guide

0 comments:
Post a Comment